Vendor Documents
Accounting > Accounts Payable > Vendor Documents
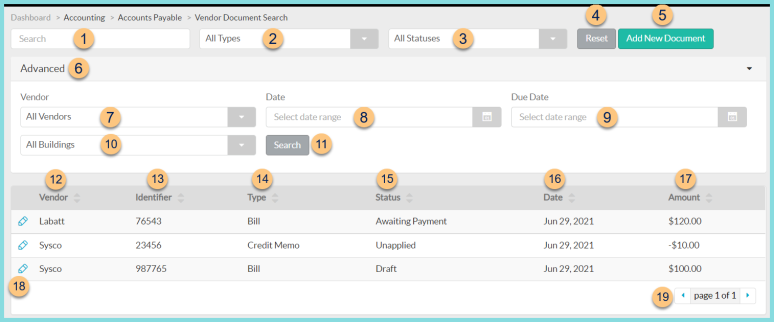
The Vendor Documents screen is used to document all bills to be paid. Bills can be automatically created in draft status by the item receipt's reference number and total amount.
-
Search - search by identifier
-
All Types - filter by type (All Types (default), Bill, Credit Memo)
-
All Statuses - filter by status (All Statuses (default), Applied, Awaiting Payment, Draft, Paid, Unapplied, Voided)
-
Reset - click to reset search parameters
-
Add New Document - click to add a new vendor document manually

- Type - select document type (Bill, Credit Memo)
- Vendor - select vendor
- Date - select document date
- Identifier - enter document identifier
- Amount - enter document total amount
- Cancel - click to return to the previous screen without saving changes
- Save - click to create the document and be redirected to the individual document screen
- Advanced - click to open advanced filters
- All Vendors - filter by vendor
- Date - filter by date range
- Due Date - filter by due date range
- All Buildings - filter by building
- Search - click to apply advanced filters
- Vendor - click to sort by vendor
- Identifier - click to sort by document identifier
- Type - click to sort by document type (Bill, Credit Memo)
- Status - click to sort by document status (Applied, Awaiting Payment, Draft, Paid, Unapplied, Voided)
- Date - click to sort by document date
- Amount - click to sort by dollar amount
- Pencil - click to be redirected to the individual vendor document
- < > - click to scroll through pages
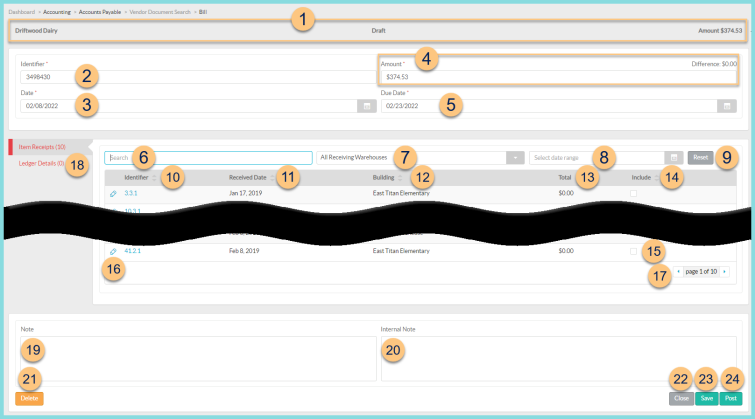
Individual Document Screen
-
Notice the Vendor, Status, and Amount.
Note: The Amount recalculates as changes are made. -
Identifier - change the document identifier if needed
-
Date - change the document date if needed
-
Enter the Amount and notice the Difference between the entered amount and the calculated amount (1).
-
Due Date - change the due date if needed
Note: The Due Date is calculated based on the document date and the Payment Term assigned to the Vendor
All available item receipts for the selected vendor are displayed on the Item Receipts (#) tab.
-
Search - search by item receipt identifier
-
All Receiving Warehouses - filter by receiving warehouse
-
Select Date Range - select the item receipt date range
-
Reset - click to reset search parameters
-
Identifier - click to sort by receipt identifier
-
Received Date - click to sort by receipt date
-
Building - click to sort by receiving building
-
Total - click to sort by receipt total
-
Include - click to sort by include status
-
Checkbox - check to include the selected receipt in the vendor document for payment
-
Pencil - click to view/edit receipt details
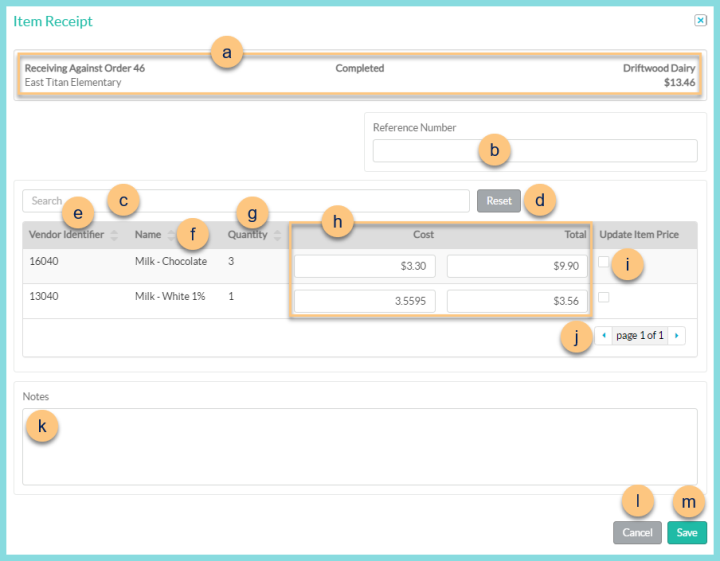
- Notice the Receiving Against Order Identifier, Receiving Building, Status, Vendor, and Receipt Total.
- Reference Number - enter a reference number if needed
- Search - search by vendor identifier or item name
- Reset - click to reset search parameters
- Vendor Identifier - click to sort by vendor identifier
- Name - click to sort by item name
- Quantity - click to sort by receipt quantity
- Update the Cost and Total as needed.
- Update Item Price - check to update the item price with the entered cost
- < > - click to scroll through pages
- Notes - add notes as needed
- Cancel - click to return to the previous screen without saving changes
- Save - click to save changes
- < > - click to scroll through pages
- Ledger Details (#) - click to switch to the Ledger Details view which allows manual entry of line items to be included in the vendor document.
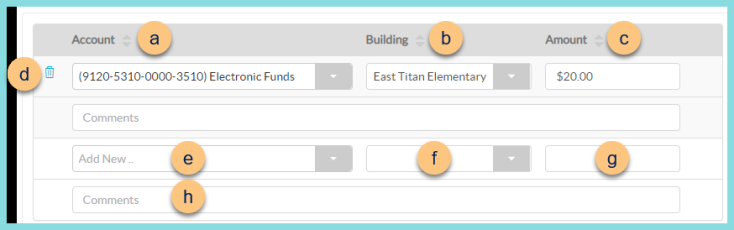
- Account - click to sort by account
- Building - click to sort by building
- Amount - click to sort by amount
- Add New - select the account
- Building - select the building
- Amount - enter the amount. Note: Once an amount has been entered, additional ledger lines will open for use if needed.
- Trash Can - click to delete line item if needed
- Comments - enter comments as needed
-
Note - enter vendor document note
-
Internal Note - enter an internal note
-
Delete - click to delete the vendor document
-
Cancel - click to return to the previous screen without saving changes
-
Save - click to save changes
-
Post - click to post the vendor document, which will be applied to a batch.
Note: Prior to posting, the Difference must be $0.00.